In the “And now for something totally different” category, I welcome . . .
Jeremy Lee, Guest Blogger

Are you using photographs as references for your artwork? Careful!
Photos lie.
Every photograph suffers from distortions. Let’s look at two types of distortions and how you can correct them.
Barrel distortion is when the sides of the image bulge out like a beer barrel. So if you take a picture of something with vertical and horizontal lines, the resulting print gives those lines an outward curve.
Pincushion distortion is the opposite. It’s where the sides seem to be pulled inward towards the center.
Since these are opposite effects, you can use one to cancel the other. (Click on More to see how.)
Most compact digital cameras have significant barrel distortion. The wider the lens, the worse the effect. So when you take a picture of someone, their nose looks bigger than it should. There will be other subtle linearity distortions too.
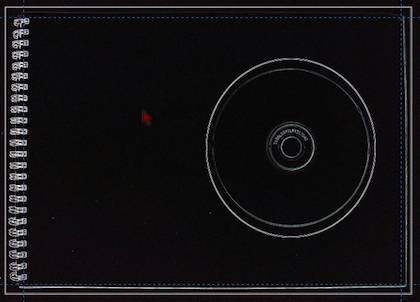
In the image Distortion 1, I photographed a white compact disk (CD) laying on some white paper in a notebook–using flash.

The result was then imported into photo-manipulation software and I drew a perfectly square boundary around it.
You can see how the edges of the paper bulge out. In particular, the notebook’s spiral binding is bent in the picture.
Then I used an edge-detect tool which turned the image black except for the edges. This made it easier to see the compact disk outline. After that I drew a perfect circle around the CD. You can see that the photo of the CD is not perfectly round. The blue dotted lines are horizontal and vertical guide lines.
The photo manipulation tool has a lens-distortion option. It was designed to simulate barrel distortion for effect! But since it could also do pin-cushion distortion which is the opposite, then I could use the tool to ‘undo’ some of the barrel distortion.
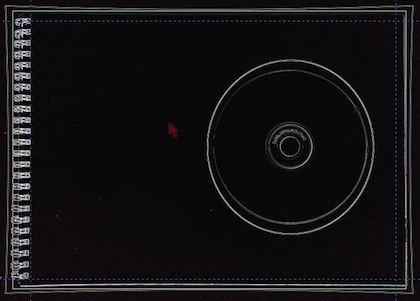
This is seen in the second image Distortion 2. The result is much better, but not perfect for two reasons.

1. When I took the photo I was not perfectly parallel to the paper. This caused it to bend more at one end. You see this dramatically when taking a picture of a building from a low angle. The roof is projected too small compared to the base.
2. The lens has non-linear characteristics. This makes straight lines wave about a little. The pin-cushion tool cannot correct for that.
In Distortion 2 you can see how my previously perfect rectangle is now pin-cushioned. This represents the amount of correction that I made to the original image.
Despite the correction, the CD is still distorted. It has more gap between the top and bottom edge and the reference circle that at the sides. So in this case, there is a disparity between the horizontal and vertical distortion.
Having learned the problem and seen a possible correction to it, as an artist, you will appreciate a way to compensate for at least barrel distortion when drawing or painting from a photographic reference. Remember: the wider lenses cause more barrel distortion.
You can correct for this in the following way.
- Take a reference shot of a rectangle from the same distance as your real subject.
- Feed the image into Photoshop, Gimp, or some other image manipulation program that can simulate pin cushion.
- Draw a digital grid over the image.
- Apply pin-cushion to correct the original.
- Print the result, which will now show pin-cushion-affected squares.
Alternatively you could correct the reference and print that out. This is difficult without a rectangular reference to work with.
Yet another option is to purchase software that knows the characteristics of each lens and will automatically correct distortions.
If you are familiar with the grid-method of transferring and scaling a flat reference, then you can understand that this method can correct the barrel distortion by drawing a perfectly flat grid on the reference and the appropriate pin-cushioned grid on your target.
Jeremy Lee is a Canadian currently living in Australia. He picked up a camera before he 10 years old, and distinctly remembers starting his first significant artwork at the age of six. He uses reference photographs for his detailed graphite portraits.


3 thoughts on “Correct Your Reference Photos”
Very helpful post. Thank you.
this is great info thanks for sharing this. I wonder if you were taking a photo for a portrait if you could frame the person in a matt board window and use that to square up the picture, taking care to get the camera parallel to the picture plane?
Thanks for this good advice. I have noticed this when I take photos of my paintings, but did not realize it could be fixed with software.
I also use photos as reference for my art.